How to troubleshoot Designjet 08:11 error, 08:04 error October 07 2019, 0 Comments

Designjetpartsfast.com now offers new Designjet printers, ink, and cartridges for immediately delivery. Models include T630, T650, T730, T830, T1600, T1700, T2600.
Watch this video to troubleshoot error:
Warning . . . HP has written the latest version of firmware that marries new boards to the printer. If you install a new board, the board is married to your printer. Used boards cannot be returned for a refund. I only sell new parts.
---------------------------------------------------------
---------------------------------------------------------------------------------
08:04, 08:11 error sub code guide.

The formatter board has either a network cable or USB cable plugged into it. Next to the connector there are 3 LEDS on the formatter board. They are labeled I, II, III. They will either be solid or flashing. You need to determine what the sequence of the three LEDS are in order to decode the error. Here are the most common errors.
This LED sequence points to a faulty Hard Disk:
LED1: FLASHING
LED2: OFF
LED3: OFF
Faulty Hard Disk:
LED1: ON
LED2: FLASHING
LED3: OFF
Replace the Formatter:
LED1: ON
LED2: OFF
LED3: OFF
Replace Formatter and Main PCA board:
LED1: ON
LED2: ON
LED3: OFF
Replace Main PCA board:
LED1: ON
LED2: ON
LED3: FLASHING
LED2: ON
LED3: ON
If that fails . . .
Having worked with this printer for many years now, this error code generally ends up being an electrical gremlin somewhere in the system that cannot be identified. Hence, retiring the printer.
Designjetpartsfast.com now offers new Designjet printers, ink, and cartridges for immediately delivery. Models include T630, T650, T730, T830, T1600, T1700, T2600.
---------------------------------------------------------------
Link to service manual pdf file:
Left Cover removal instructions begin on page 414.
Right Cover removal instructions begin on page 475.
---------------------------------------------------------------
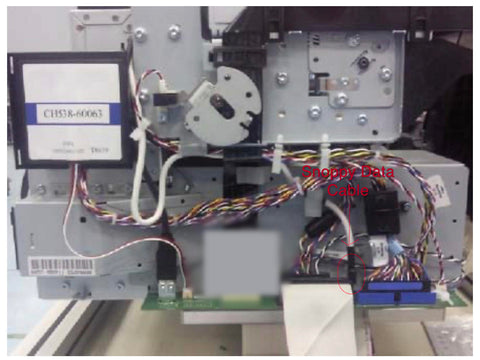
Engine PCA Snoppy cable.
1. Remove the left cover.
2. Unplug the Snoppy Data cable on the Engine PCA.

3. Reboot the printer, and check printer behavior.
Front panel cable and interconnect PCA.
1. Remove the right cover.
2. Locate the interconnect PCA (4x4 board, facing front).
3. Unplug the cable in the upper right corner (labeled printer data).

4. Reboot the printer, and check printer behavior.
Does the printer boot up normally?
If yes, cable is shorting out the printer. Either use the printer as is, or else, replace the cable.
I have a replacement cable in stock, ready to ship. Please contact me for a quote.
If no, is the LED light on the interconnect PCA?
If no, the board may be dead; I would try replacing the PCA.
If the LED is 'on' PCA board is good.
07.1:11 error indicates the cable is disconnected. If you get this, it confirms
the cable is good.
All parts are available elsewhere on the website.
Best Regards,
Tom
260.348.5653
