How to replace a Designjet Z6, Z9, T1700 Hard Disk July 27 2023, 0 Comments
Service manual procedure to replace hard disk listed below Appendix.
Ready to order? Select your model Designjet:


Appendix A: Emergency firmware upgrade with USB flash drive
Appendix B: Obtaining the printer log and the diagnostics package


When it is not possible to perform a firmware upgrade using the normal procedures (for instance, in case of a System Error and the Embedded Web Server is unavailable), it is possible to perform an emergency firmware upgrade using a USB flash drive. Follow the next steps:
1. Copy a valid FMW firmware file onto a USB flash drive (formatted in FAT32). This file is provided in DesignJet
Online. Remove all other contents in the flash drive.
2. Turn off the printer.
3. Connect the USB flash drive to the USB port next to the Front Panel.
4. Turn on the printer and follow the instruction on the Front Panel.
Appendix B: Obtaining the printer log and the diagnostics package
The printer keeps an internal log of its own actions. When a system error occurs, the printer log can help to find the cause and the solution. By default, whenever it restarts, the printer deletes the current log and starts a new one, to avoid using a lot of hard disk space. Once the logs have been captured, the information can then be escalated to HP division for analysis.
Retrieving the diagnostic package
There are two ways of retrieving the diagnostic packages:
● From the Front Panel with a USB flash drive.
● From the Embedded Web Server.
When you have obtained the information, it should be attached to the customer case.
Retrieving the diagnostic package through the Front Panel method
This method works only if you have a standard USB flash drive. If you do not have a flash drive, use the Embedded Web Server method.
1. Take a standard USB flash drive, formatted as FAT32.
2. Create an empty file in the USB flash drive (right-click, New ►Text Document) and name it pdipu_enable.log. Then insert the USB flash drive into the printer. Once the printer recognizes the USB, a short beep will be emitted.
3. The printer starts to copy the diagnostic package to the USB flash drive. You may hear several short beeps
for each file copied to the USB flash drive.
4. Wait until the message Finished appears. You will hear one long beep, that means the entire diagnostics
package and the printer log have been copied to the USB flash drive. You can now remove the drive.
5. It will have created a folder with the name part number_serial number_time stamp, and in this folder you’ll
find one or more files with the extension trb. As the name of the folder contains the serial number, you can
reuse the flash drive for different products and the information will not be lost.
6. Disable the logs in the printer after the diagnostic package has been retrieved. See Disabling the logs in the printer through the touch control screen on page 176.
1. You can access the Embedded Web Server by typing the IP address of the printer in a Web browser. In the Support menu, click Service support to display the following page.
2. You can download the package by clicking the Download button under the Diagnostics package section of the page.
 The Diagnostics menu sub-system
3. When you have finishing using the extended diagnostics package, remember to disable it; otherwise it could affect printer performance or even cause undesirable side-effects.
0001-E-Box 0001-01 Check main electronics
Description: This test checks the single rail PSU voltage, the formatter (processor, RAM, BIOS), the mechatronic PCA and the hard disk status.
0001-02 Check connectivity
Description: This test checks the connectivity board status.
0001-03 Check disk
Description: This test checks whether the hard disk drive is in optimal condition (if the printer has a hard disk drive).
0001-04 Reset HDD to be removed
This utility resets the NVM values found in the HDD, so it can be removed from the printer. If, for troubleshooting purposes, you install a hard disk drive as a service part, and you want to remove it, run this diagnostic in order to enable the service part to be used again.
Z6 Hard Disk T8W15-67003
Z9 Hard Disk W3Z71-67006
T1700 Hard Disk 1VD88-67003
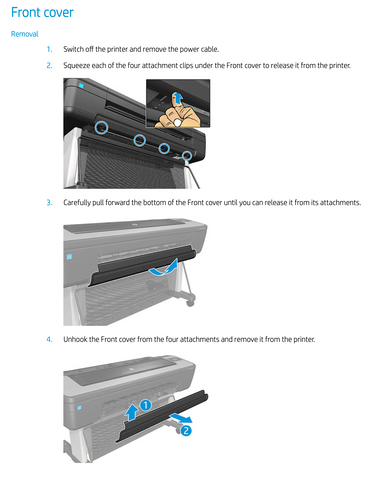
How to replace the hard disk: